Table of Contents
Section 4 - Setting up Virtual Modem
Required packages
For the connection script to work properly, your Raspbian installation needs a few prerequisite packages. The most important of these is the PPP daemon “pppd” and IP Tables to route packets. Also xxd is used to decode raw bytes from the input stream. xxd should be preinstalled on Raspbian, but I'm including it in the installation list here just in case.
- Run the following commands to install pppd, iptables and xxd:
sudo apt-get update
sudo apt-get install ppp iptables xxd
Download VModem and adjust settings
In the next chapter we will download and install vmodem onto your Raspberry linux box!
- If you would like to optionally view the source code and a few more coding examples, click here
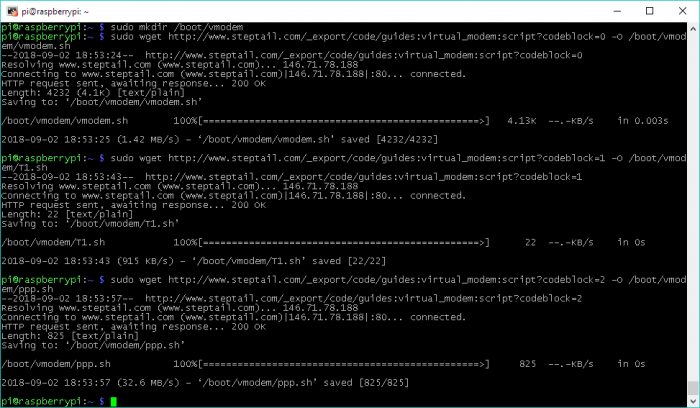
- To just download and install vmodem, execute the following commands:
sudo mkdir /boot/vmodem
sudo wget http://www.steptail.com/_export/code/guides:virtual_modem:script?codeblock=0 -O /boot/vmodem/vmodem.sh
sudo wget http://www.steptail.com/_export/code/guides:virtual_modem:script?codeblock=1 -O /boot/vmodem/1.sh
sudo wget http://www.steptail.com/_export/code/guides:virtual_modem:script?codeblock=2 -O /boot/vmodem/ppp.sh
- You have now downloaded the following three files on the Raspberry Pi:
- /boot/vmodem/vmodem.sh
- /boot/vmodem/1.sh
- /boot/vmodem/ppp.sh
- Make sure they are executable:
sudo chmod 770 /boot/vmodem/vmodem.sh
sudo chmod 770 /boot/vmodem/1.sh
sudo chmod 770 /boot/vmodem/ppp.sh
Name of the serial port
The VModem script has been preconfigured to use ttyUSB0 as the default serial port name. Typically Raspbian will call its first serial port adapter ttyUSB0 when using USB to Serial converters, and you won't need to modify this script. However, if the name is something different, such as ttyAMA0, you may need to update the script to point to the correct serial port name. The following section described how to double-check your serial port name:
To confirm your serial port name, do the following:
- Make sure the serial-to-USB adapter is connected.
- Run the command:
ls /dev/tty*
- If you do not see
/dev/ttyUSB0listed, you will need to update the script with the correct serial port. Visit this page to update the script with the correct serial port. - If you do see
/dev/ttyUSB0listed, continue on!
Name of the ethernet interface
For the sake of this tutorial we have used wired Ethernet. If you want to use Virtual Modem over a wireless connection, you will need to make sure it is properly set up, then update the script where it says etherp=eth0 to say etherp=wlan0 instead. To change the ethernet port in the vmodem.sh script, do the following:
- Run
sudo nano /boot/vmodem/vmodem.sh - Find the line
etherp=eth0and change it to readetherp=wlan0. - Save file by pressing CTRL + o, then ENTER to save under the same name.
- Exit editor with CTRL + x.
Network test on the Raspberry Pi
This would be a good time to test your network to eliminate any future headaches.
- Over SSH run the command:
pingwww.google.com - If you get ping replies, you are all set and the networking on your Raspberry Pi is working.
- Press Ctrl + Z to stop ping.
Initial VModem testing
To test VModem, you should be able to simply run the script. Test it first over SSH to see it's output:
- If you have not done so already, connect one end of your serial cable to the Raspberry Pi's USB-to-serial adapter, and the other end of the serial cable to a computer which has a terminal software installed. You can use any terminal, such as PuTTY or the built-in HyperTerminal on Windows 9x.
- Make sure you set the appropriate serial speed settings on the terminal program before you connect (by default VModem is set to operate at 57600 bps).
- Connect with the terminal program to the Raspberry Pi.
- Open up PuTTY (or your other SSH client of choice) and connect over SSH to the Raspberry Pi. Issue the following commands.
cd /boot/vmodem
sudo ./vmodem.sh
- If you see the READY text on the Raspberry Pi, the script is ready to accept connections.
- Now, open up a SERIAL terminal, for example, PuTTY or HyperTerminal on the computer, and issue a few basic Hayes commands.
- If you are using HyperTerminal as your serial terminal
- When you start HyperTerminal, hit cancel when it asks for the phone number. This should take you directly to the serial console
- If you are using PuTTY as your serial terminal
- Under Connection type, select Serial.
- In Serial Line text box, type in COM1, COM2, or other COM port that you are using.
- Under Speed, select the connection speed that you are using, by default VModem is set to 57600, so you will match that speed.
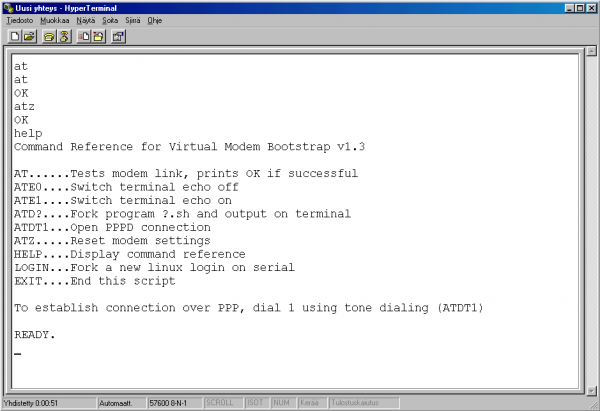
- First press ENTER a couple of times to sync up. Then type “AT” and then press ENTER. You should receive an “OK” response.
- If you receive a garbled or no response, the serial speed settings may be wrong. Make sure both computers are set to the same serial speed.
- If you do not receive any response, something may be wrong with the serial settings, or with the connection to the Raspberry Pi. Does the computer have a fast 16550 UART and a good USB-to-Serial adapter? (check section 2 of this tutorial).
- Check to see that the vmodem.sh script is running and is receiving your keystrokes. If it working, it should echo your input from the serial terminal to the script's output.
- If you're still not able to get it working, see the Troubleshooting section below.
- On a serial terminal, this is the output you should be getting:
- Over on the Raspberry Pi, you should be seeing the corresponding output:
Go ahead and continue to the next part of this guide, where we will go through using Virtual Modem!


