Table of Contents
Connect Windows 95/98/Me to the Internet with Virtual Modem
This tutorial will get a Windows 95/98/Me computer (the client computer) connected on the network using only it's serial port and a Virtual Modem PPP interface software running on the Raspberry Pi (the host computer), or another host device running the virtual modem interface software. If you have not already, please follow the instructions how to set up Virtual Modem as it is a prerequisite for this tutorial. Make sure the serial cable is connected between the Raspberry Pi and the Windows computer, and that the vmodem.sh script is running on it before attempting this part of the guide.
You can connect to the Internet with the built-in Dial-up Networking (“DUN” for short) of Windows 95/98/Me, no network card needed. We will go through the steps how to set up a modem and then a dial-up connection on your Windows 95 (or later) computer. For the sake of completeness, we will then test the connection using Netscape Communicator 4.0, but you're free to use any web browser.
Once again, please make sure you have VModem set up and running and a serial cable is connected between the Raspberry Pi and your Windows 9x computer before attempting the following steps.
Dial-up Networking has been tested working with a clean install of Windows 95 OSR 2.5 (4.00.950 C), Windows 95 with DUN 1.4 update, and Windows 98 Second Edition.
Modem Setup
For you to connect to VModem running on your Raspberry Pi, you must first tell Windows 95 that you have a modem that you can use, and it is connected to your serial port on your computer and it is a Standard Modem. Once you've set up the modem, you can set up the dial-up connection.
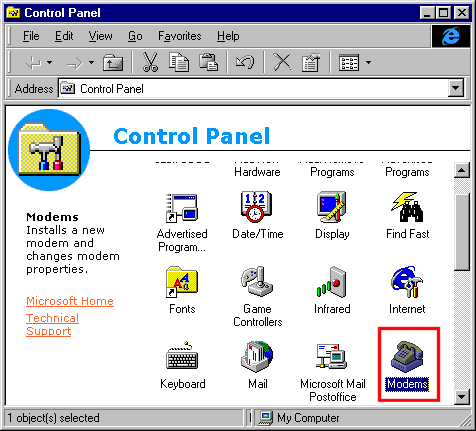
- Open Control Panel. Double-click on Modems:
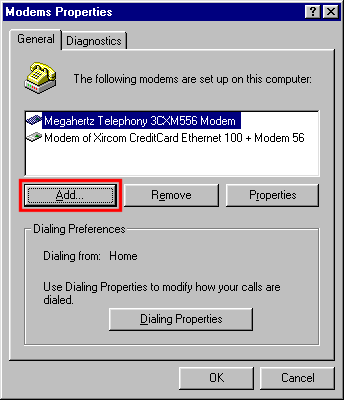
- Click Add:
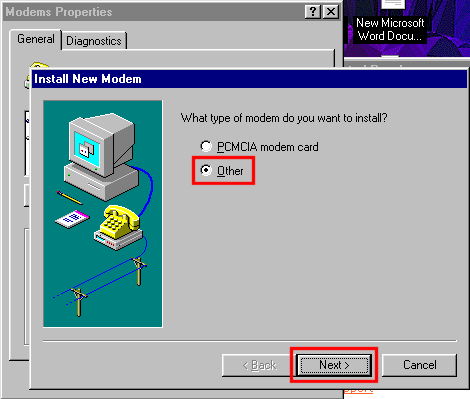
- If you get this prompt, go ahead and select Other, then hit Next >:
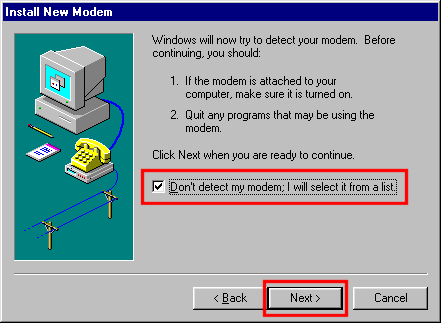
- Make sure the check the box Don't detect my modem; I will select it from a list. Then click Next >
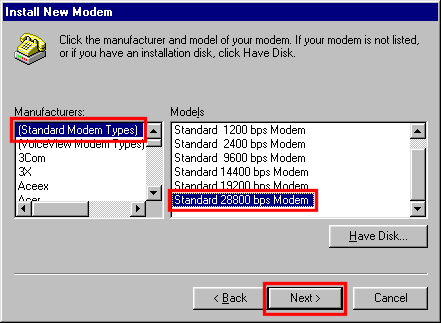
- Under Manufacturers, select (Standard Modem Types). Under Models, select Standard 28800 bps Modem. You will be able to adjust the speed later to communicate faster than 28800 bps, but for now be sure to select this modem, because it is one of the modems supported by the script.
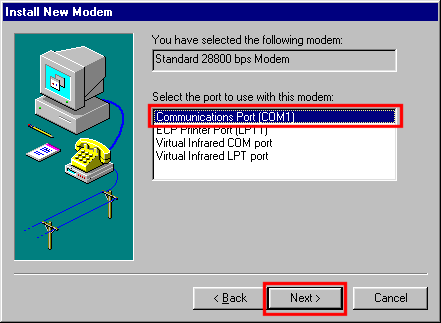
- Some computers have more than one serial port, usually labeled COM1 and COM2 in Windows. We will be using the first serial port COM1. If you have the Raspberry connected on any other port, make adjustments as necessary.
- Select the Serial COM port the Raspberry is connected to. If you've connected your Raspberry Pi via Serial cable to Serial Port 1 (COM1), select Communications Port (COM1), then click Next:
- If you get a prompt for an area code, type in '0' for now.
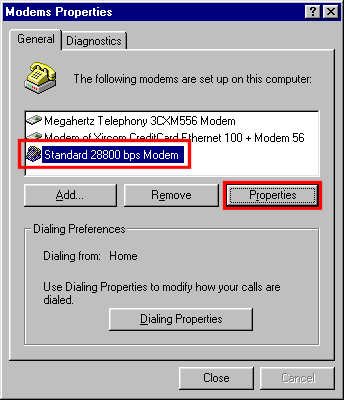
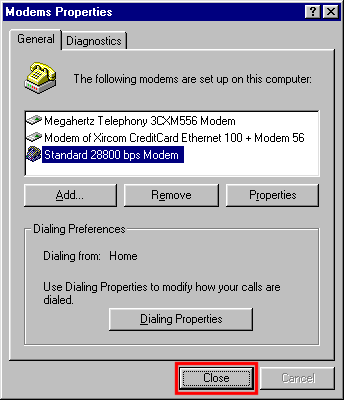
- Under Modems Properties window you will want to select the modem you added Standard 28800 bps Modem, and then hit Properties
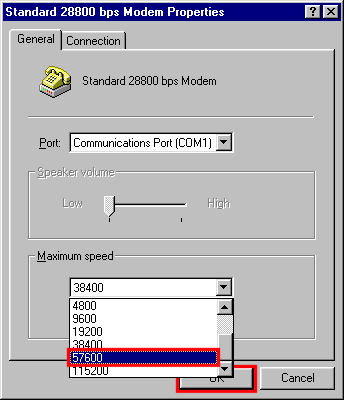
- We will now tell Windows that the Raspeberry Virtual Modem is communicating at 57600 bps. This is the default speed of the vmodem script. If you have modified the script, make adjustments as needed. Make sure both the speed setting on the script and this setting are the same or the script will not work. If you adjust the script, you may need to restart the script (or if you have it running on boot, restart Raspberry Pi entirely with “sudo shutdown -r now” to restart and reload the script with the new speed setting).
- Under Maximum speed, select 57600 and then click OK:
- Back in Modems Properties hit Close to exit the window.
Dial-up Setup
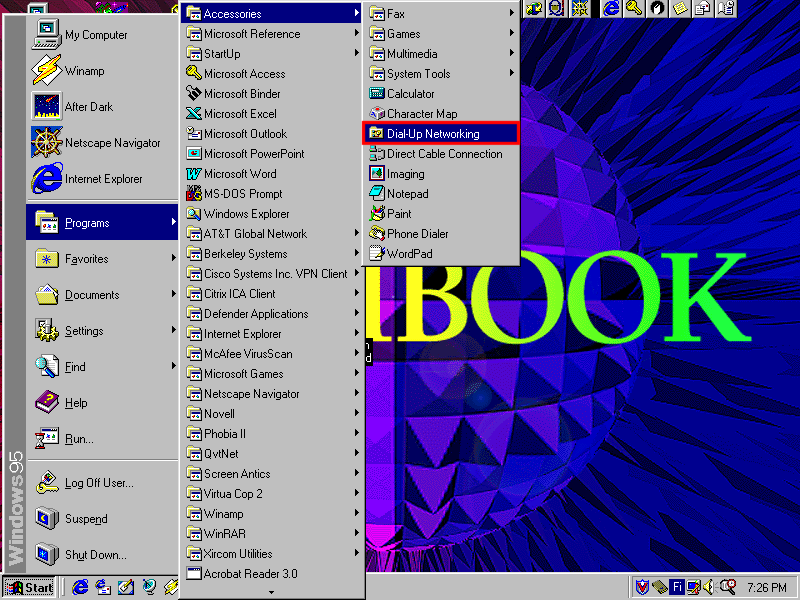
Almost there! What we need to do next is tell Windows that there is a phone number you want to dial, and the modem you want to use is Raspberry Pi Virtual Modem. Go ahead and open up Dial-Up Networking from the Start menu.
Note!
- If your computer is a clean Windows 95 install, Go to Start –> Programs –> Accessories –> Dial-Up Networking
- If your computer is Windows 95 with DUN update 1.4, or Windows 98 or newer, go to Start –> Programs –> Accessories –> Communications –> Dial-Up Networking
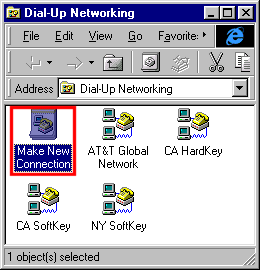
- Double click on Make New Connection
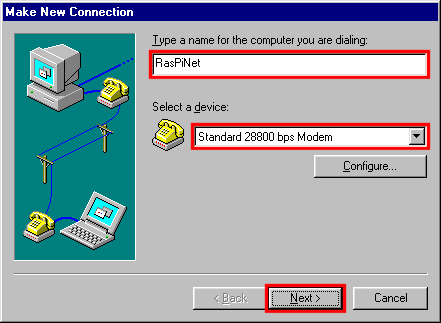
- Give your new connection an appropriate name. Select your newly installed Modem - Standard 28800 bps Modem, then click Next >
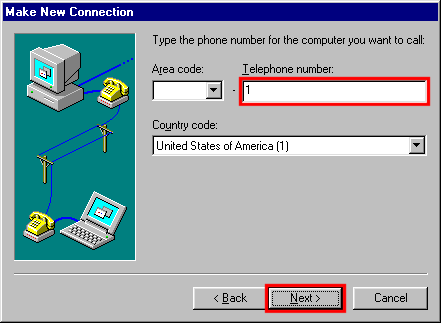
- Inside the Telephone number box, type in the number 1. Dialing 1 will execute the script 1.sh on the Raspberry Pi, which by default initiates a PPP connection with the client (Windows 95) computer. You can rename this script to whatever you want if you'd like to customize the phone number. Just make sure the script ends with the .sh extension.
- Country code must match your computer's locale.
- Leave everything else to their defaults.
- Then click Next >
- Hit Finish.
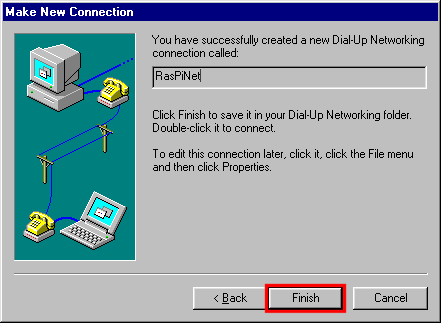
- Congratulations! This finishes the set up portion of this tutorial.
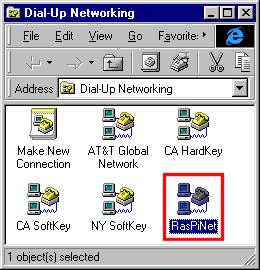
- Double click on the newly created dial-up connection. In our case it was called RasPiNet
- Leave everything to their defaults, as they shouldn't matter here. Hit Connect.
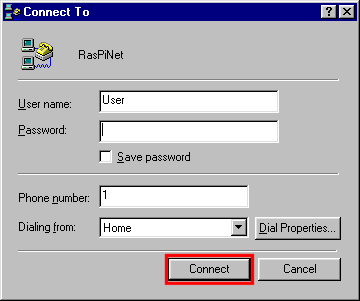
- You will see Windows attempting a connection.

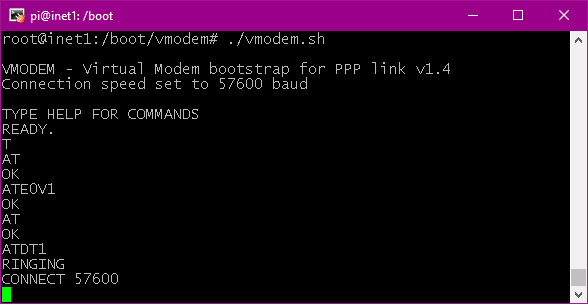
- If you have the virtual modem script visible, you will see the Hayes commands being sent from the Windows computer in realtime:
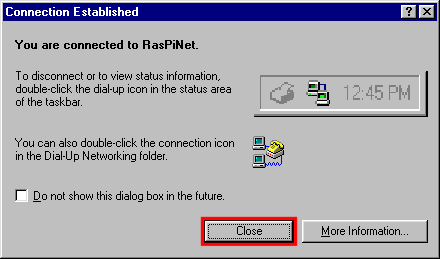
- If everything goes well, after a while you will see the Connection Established window. Congratulations!
- Windows 9x now genuinely thinks that you have connected to your Internet Service Provider. You can close the window.
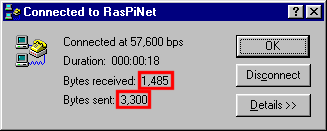
- You can check on the status of the connection by double-clicking the dialup connection indicator.

- On your first connection, you should see some bytes received and sent. The initial data that was received from Raspberry is the pppd handshake, with the usual network configuration information.
Internet Access
You should now be able to access the Internet. However, many modern websites will require modern security and will refuse to communicate with older web browsers. You can use ProtoWeb to surf the 90's Internet, and I've also went ahead and compiled a list of websites that do work.
- Click here to see the list of websites that will work with legacy web browsers!
- If you'd like to access archived websites directly from your browser by typing in the URL, you can use ProtoWeb as a proxy server, which serves archived websites from the 90's. The ProtoWeb Proxy Server is straightforward to setup in many web browsers, and will allow you access to websites circa 1995-2000.
Warning
- Old web browsers are fairly vulnerable to today's hacks and depending on the website(s) visited, may allow malicious software on the computer. Proceed at your caution.
- You may use www.protoweb.org to surf only classic websites, which do not exploit newer browser vulnerabilities.
- If you plan on visiting websites that are live today, you may consider disabling Javascript in the web browser settings. If Javascript is enabled, it may cause all sorts of pop-up errors to show up on modern websites to the point where it could make the whole web browser unusable.
Troubleshooting
Unable to establish any connection to the script
- It is always a good idea to test the script first using a terminal emulator, such as Hyper Terminal or PuTTY on Windows 9x to make sure communication works.
- If you get no connection or garbled text, you may try to play with the Flow Control settings. Sometimes you will need to select Hardware, or XON / XOFF for the flow control.
- Make sure the Max speed setting matches what the script is operating on.
- Make sure you are using the right COM port on the computer or terminal emulation software. Go to Control Panel –> System –> Device Manager and under Ports, verify your serial port name. For example in my case it is COM1.
Unable to connect on dial-up
- Make sure vmodem script is running on Raspberry Pi
- Did you install the Generic 28800 modem? You may also try a Generic 33600 baud modem. We know that some modems like the V56.flex will not work with vmodem (yet). Try a Generic 28800 or 33600 modem. You can always adjust the speed in the modem settings.
- Some older computers (namely 486's and older) may not capable of operating at fast serial speeds due to their older, more limited serial UART chips and problems with cheap USB to serial adapters. If you're unable to connect at 57600 or faster, try slower speeds, such as 9600 baud at first. Adjust both the vmodem.sh script and the computer to connect at only 9600 baud. If that works, work your way up to see where the limit for your specific computer is. If you want faster speeds, you may try to upgrade the computer with a serial I/O card with a 16550 UART.
Dial-up connects, but no websites open
- Most current websites do not support unencrypted HTTP connections. As far as I understand, old operating systems do no longer have valid certificates, and this prevents connections to most websites. You can still explore archived websites using a Wayback Proxy server. See the section Internet Access for more information.
- If your dial-up connection works, but you're absolutely not able to open any website, even after setting up the proxy server, try checking your IP configuration. In Windows 95, 98 and Me you can view your settings by running WINIPCFG from the Run dialog box.
Video recap
- Video illustrates all the required settings in a Windows 95 OSR 2.5 (Rev C) 486 PC with the DUN 1.4 update.
