This is an old revision of the document!
Table of Contents
Section 4 - Setting up Virtual Modem
Required packages
For the connection script to work properly, your Raspbian installation needs a few prerequisite packages. The most important of these is the PPP daemon “pppd” and IP Tables to route packets.
- Run the following commands to install pppd and iptables:
sudo apt-get update
sudo apt-get install ppp iptables
Download VModem and adjust settings
In the next chapter we will download and install vmodem onto your Raspberry linux box!
- If you would like to view the source code and more coding examples, click here
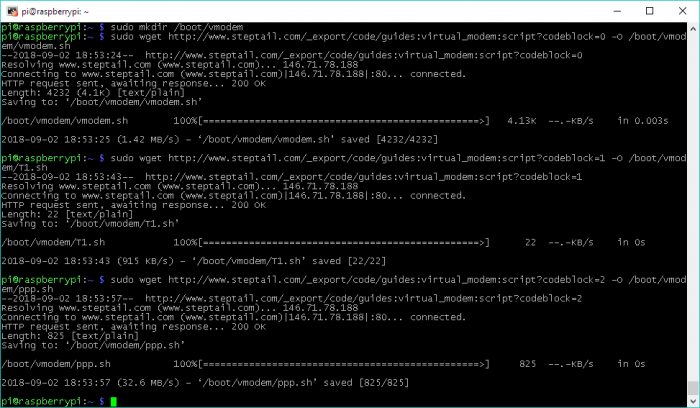
- To download and install vmodem, execute the following commands:
sudo mkdir /boot/vmodem
sudo wget http://www.steptail.com/_export/code/guides:virtual_modem:script?codeblock=0 -O /boot/vmodem/vmodem.sh
sudo wget http://www.steptail.com/_export/code/guides:virtual_modem:script?codeblock=1 -O /boot/vmodem/1.sh
sudo wget http://www.steptail.com/_export/code/guides:virtual_modem:script?codeblock=2 -O /boot/vmodem/ppp.sh
- You have now downloaded the following three files on the Raspberry Pi:
- /boot/vmodem/vmodem.sh
- /boot/vmodem/1.sh
- /boot/vmodem/ppp.sh
Name of the serial port
The VModem script has been preconfigured to use ttyUSB0 as the default serial port name. Typically Raspbian will call its first serial port adapter ttyUSB0 when using USB to Serial converters, and you won't need to modify this script. However, if the name is something different, such as ttyAMA0, you may need to update the script to point to the correct serial port name. The following section described how to double-check your serial port name:
To confirm your serial port name, do the following:
- Make sure the serial-to-USB adapter is connected.
- Run the command:
ls /dev/tty*
- If you do not see
/dev/ttyUSB0listed, you will need to update the script with the correct serial port. Visit this page to update the script with the correct serial port. - If you do see
/dev/ttyUSB0listed, continue on!
Network test on the Raspberry Pi
This would be a good time to test your network to eliminate any future headaches.
Over SSH run the command:
ping www.google.com
- Press Ctrl and Z to stop ping.
Initial VModem testing
To test VModem, you should be able to simply run the script. Test it first over SSH to see it's output:
- Connect one end of your serial cable to the Raspberry Pi, and the other end to a client computer which has a terminal software installed. You can use any terminal, such as PuTTY or the built-in HyperTerminal on Windows 9x.
- Make sure you set the appropriate serial speed settings on the terminal program before you connect (by default VModem is set to operate at 57600 bps).
- Connect with the terminal program to the Raspberry Pi.
- Over SSH, on the Raspberry, issue the following commands.
cd /boot/vmodem
sudo ./vmodem.sh
- If you see the READY text on the screen, the script is ready to accept connections.
- To exit VModem and return you back to shell, you can press CTRL + z
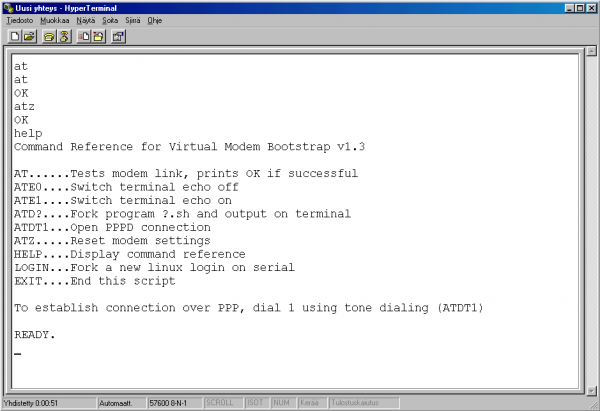
- The script emulates a few basic Hayes commands, so you should be able to issue the AT command on the terminal. Type “AT” and then press ENTER. You should receive an “OK” response. If you do not, you may need to press sync up the connection by pressing ENTER a couple of times.
- On a serial terminal, this is the output you should be getting:
- Over on the Raspberry Pi, you should be seeing the corresponding output:
- If you get any error messages, take a note of them and look for commonalities in any steps you've taken before this step. Open up the script vmodem.sh for editing to make sure the baud and serial port are properly set. If you're unable to figure it out, feel free to contact me (see bottom of page).
Getting online
Now you can proceed to check out the system specific guides on how to interface different vintage computers and devices with VModem:
- Connecting a Macintosh Classic to the Internet COMING SOON
Make sure vmodem.sh is running on the Raspberry Pi first before attempting connection!
Making Virtual Modem run at startup
After you have verified that the VModem works properly on the console (see previous section), and you are able to connect to the Internet, you can make VModem run automatically as a background process after the Raspberry Pi is powered on.
There are two ways you can do this:
1) You can either run the following command which will automatically add VModem to your /etc/rc.local:
sudo sh -c 'printf "`head -n -1 /etc/rc.local`\n\ncd /boot/vmodem\n./vmodem.sh &\n\nexit 0\n" >/etc/rc.local'
2) Or you can edit your rc.local manually. Make sure your /etc/rc.local has the following at the bottom:
# Start serial port and simulate a modem
cd /boot/vmodem/
/boot/vmodem/vmodem.sh &
exit 0
- Restart Raspberry and test the changes. After rebooting, VModem should automatically start up with system processes and start expecting connections on serial.
Further steps
You can now proceed to connect your retro machine to the Internet using Virtual modem.
- Connecting a Macintosh Classic to the Internet | COMING SOON
- Connecting a Dumb/Smart Terminal to the Internet | COMING SOON
Skip to other sections
- Section 4 - Setting up Virtual Modem « You are here
Related Topics
- List of Compatible Websites | List of classic websites that work with pre-2000 legacy web browsers.
- Steptail Wayback Proxy Server | Connect your retro computer to a mirrored copy of the Internet as it was in 1996!
Questions? Comments? Contact Me!


